I would like to ask any sewing machine experts to please point out anything I'm doing wrong. I'm a self taught sewer and am learning about the machine by working my way through the manual.
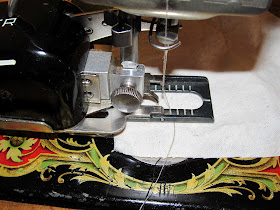
This is a Singer 128 hand crank sewing machine.
It's a nice little portable machine and takes the same bobbins and shuttle as my Singer 127.
I need to make some button holes, and just in case you didn't know yet, these vintage machines don't do a zig-zag stitch. Gasp! Whatever will I do?
Never fear, I have an attachment for that!
 |
| Vintage Sewing Machine Buttonholer attachment |
The buttonholer, or button hole attachment is a marvellous thing. It works on almost any of the old straight stitch vintage machines with a low shaft foot. I think you can get a high shaft one, but I have yet to see it.
Very First thing to do is to check your thread tension.
The
 |
| Vintage Buttonholer feed dog cover |
If you don't have a plate like this, another option would be to remove the feed dogs temporarily while you use the attachment. You need a screwdriver and to get underneath the machine. I haven't tried this yet, but I'm told it's fairly easy as feed dogs often need to be replaced over the years.
Next you set up the buttonholer with the right size cam. There are a bunch of different size templates that can go inside the buttonholer to make different size button holes.
 |
| Vintage buttonholer attachment cams |
 |
| upside-down buttonholer |
And a bar that attaches to the pressure foot vertical-up-down-thing-I-can't-remember-what-it's-called-right-now.
Insert the fabric between the feed dog cover plate and the buttonholer. Lower pressure foot. Sew as usual. In theory the buttonholer will hold the fabric for you and move it as needed, so all you need to do is make certain the thread does not tangle, the machine moves at an even pace and the weight of the fabric does not pull at the sewing.
 |
| Not so sure about this 'add caption' option, what do you think, is it helping? |
 |
| buttonholer in action |
 |
| Buttons are happy, the hole fits! |


Ha,ha - I thought the buttonhole was going to be the size of the oval hole in the black base bit! Seriously, thank you for posting this - I'm trying to get to grips with the attachments on my Featherweight, so it's really useful.
ReplyDelete