Monday, February 28, 2011

Singer 127 - Thread


I don't know if this might help or interest anyone out there, but I'm putting together a series of Getting to Know my Antique/Vintage Singer Sewing Machine (Singer 127). Today I learnt about Thread.

I would like to ask any sewing machine experts to please point out anything I'm doing wrong. I'm a self taught sewer and am learning about the machine by working my way through the manual.


I'm sewing away at my treadle antique Singer sewing machine (model 127), which I have named beautiful sphinx because of the pretty decals it has on it, and I'm amazed at how fast it can sew. It takes no perceptible effort from me to treadle this machine and sew just as quickly as on any electric machine I ever met. It's so interactive. I can slow down or speed up without thinking. Maybe it's a symptom of spending so many hours at a spinning wheel but I tell you, sewing on a treadle machine is the cat's meow!

Sewing is no longer an endurance challenge I undertake to acquire clothing, it is now a joyful process in and of itself.

Which is good news because I've been sewing a lot lately. A wonderful shop commissioned me to sew cloth bags for their store. The bags will then go to another local person who will silk screen the shop's logo on it. It feels really neat to be part of a local economy like that.


As for the sewing machine. I had the most frustrating morning yesterday. Every time I would get into the rhythm of sewing, something would go wonky. The biggest problem I had was this.


Can you see how the top thread seems to be fraying? It's like 1 ply of the thread has broken and just refuses to continue sewing. Of course it only does this when I am top stitching so that I have to undo a bunch of sewing every time it happens.

Whenever something goes wrong with the sewing machine, my first remedy is to re-thread everything. This fixes about 75% of problems. The second remedy is to clean the machine of any lint and give it a bit of oil. This solves just about all the troubles that sewing can produce. But sometimes that isn't enough. This seems to be one of those times.

I thought that since the thread was fraying above the needle, that maybe the needle was bent. I changed the needle and it didn't happen again. But it has happened before, with different needles. So I'm wondering if the size of the needle is too small for the thread. I am using regular thread but size 10 needle. Thoughts?


Did you know that not all sewing machines take the same size needle? Some of the older ones require special size needles.


Sunday, February 13, 2011

Singer 127 - Cloth Guide and Thumb Screw attachment


I don't know if this might help or interest anyone out there, but I'm putting together a series of Getting to Know my Antique/Vintage Singer Sewing Machine (Singer 127). Today I learnt about an attachment called The Cloth Guide and Thumb Screw.

I would like to ask any sewing machine experts to please point out anything I'm doing wrong. I'm a self taught sewer and am learning about the machine by working my way through the manual.


Among the many attachments that came with my antique sewing machine, I discovered The Cloth Guide and Thumb Screw.

What a fun name for something that is so extremely useful.


From a little booklet I found with the attachments:

THE CLOTH GUIDE AND THUMB SCREW
This is an attachment designed as a guide for straight stitching when making wide hems, deep tucks or seam widths which are greater than Presser Foot allows. It is attached to the machine as illustrated [a photo not unlike mine here is included in the booklet].....a very simple operation.


I wish I knew who wrote this booklet and supplied the attachments, but that remains a mystery for the time being. For those who are interested, the booklet is called Direction For Using This Set of Attachments, and has a picture of a Ruffler on the front cover.


I've been sewing these bags that I mentioned before for a local shop. My sewing machine is directly in front of the largest window in the house with a wonderful view of chickens, ducks, alpacas, wild quail, and all sorts of amusing things. Sometimes I get detracted and as bags require a lot of long straight seams (especially for the handles), I often have to take out my stitching and re-sew. As my attention wonders so does my stitch line. So frustrating, but this cloth guide has really saved the day.

As you can see, the cloth guide screws into your choice of two holes to the right of the needle. Well, my machine has two holes, I don't know how common this is. You keep the edge of the fabric against the guide as you sew and as if by magic, you are suddenly sewing in very straight lines.

I was sceptical at first, but I thought it must be worth a try. In my opinion, it is totally awesome and is now part of my every day sewing accessories.


Saturday, February 12, 2011

Singer 127 - thoughts on oil and oil wicks


I don't know if this might help or interest anyone out there, but I'm putting together a series of Getting to Know my Antique/Vintage Singer Sewing Machine (Singer 127). Today I learnt about The Wick.

I would like to ask any sewing machine experts to please point out anything I'm doing wrong. I'm a self taught sewer and am learning about the machine by working my way through the manual.


I was reading the manual I downloaded for my treadle powered Singer 127 (Beautiful Sphinx), trying to figure out what to oil. The diagram is, um, well, blurry would be an understatement. If I could figure out where to oil, I would take a photo of the machine and photoshop some brightly coloured arrows to each oiling point. Of course, I also have to relearn how to photoedit, but that comes with the territory.

Reason tells me that I'm not the first person online to wonder about how to oil my antique sewing machine. One would assume that a google search would produce the photos I was planing to make. Surely someone else out there had trouble interpreting the manual and thought why not make life easier for others.

But no. Either my google powers are too weak or the photos I seek are not out there. Maybe everyone else can understand what is meant when the manual says to apply a drop of sewing machine oil to each of the places indicated in the blurry picture.

If anyone knows of such a resource, please point me in the right direction. I'm really not in the mood to download a photo editing program and learn how to use it.


There is however, one resource I've come across recently that is promising. Treadle On is a site focused on Human Powered sewing machines. I love that, human powered bit. It makes me feel all warm and fuzzy inside.

Treadle On has resources like how to get that gucked up old machine you found at a garage sale working again: cleaning and lubricating a machine head.

There are also some nice resources about the vibrating shuttle machines. My Singer 127 is a vibrating shuttle sewing machine. Happy days!

On the page about winding and threading the shuttle, I found this photo.


Now the manual for this machine tells me that I should fill the wick with oil, but I couldn't find it anywhere on my machine. But here it is. Just a bit of red felt. See the internet can be a great resource after all.

I'm off to go cut myself a wee bit of felt to stick in my wick hole. (wait. did that sound rude?). I hope that will do the trick. The more I use the machine the louder the shuttle seems to get. Fingers crossed that this is all that I'm missing.


Friday, February 11, 2011

It arrived!

The most exciting thing happened to me yesterday: My Victorian Corset making kit arrived from Farthingales. It has the Laughing Moon Victorian corset pattern and everything I need to make it including fabric and bones and other stuff. I am super-excited about making this.

Farthingales added a little note with the kit with some suggestions. The kit itself is for the Dore version of the corset (the pattern has two different styles of corset in it and a whole range of sizes) and it is suggested that I use this kit as a starting point to learn how to make a corset and how to alter the pattern if necessary.

Apparently the Dore is easiest to make, but I think that the other corset, the Silverado is more what I need for my body type. Given that I want this to be for support rather than shrinkage, I am tempted to make the Silverado, but then again, this is a project for learning and I think both patterns will do the job.

The fabric included in the kit is true corset fabric. A tight herringbone cotton called Coutil. This is very strong and has virtually no give to it which will be perfect.

The fabric is also very white. There is a definitely need for decoration.

I was thinking that I might add some flossing to the corset. Flossing is not only very pretty embroidery, it also helps to strengthen the fabric at the tips of the bones so that the bones don't wear holes and start poking. Here are some exciting examples of flossing.

I wonder at what stage of corset making do I floss my fabric?


Sigh... As much as I want to get started, that's all plans for the future. Right now I'm working away at my very first sewing job. A local shop has very kindly given me the contract to sew the cloth bags for their store. They will then either paint, stamp, silk screen, or all of the above, their logo on the bags.

Isn't it wonderful when a local business gives the work to local craftspeople instead of ordering from some multinational corporation? Well I think they are just the cat's meow. Now back to my sewing machine. When I get these bags done than I can take some time and sew for myself.

Wednesday, February 09, 2011

Singer 127 - the narrow hemmer foot!


I don't know if this might help or interest anyone out there, but I'm putting together a series of Getting to Know my Antique/Vintage Singer Sewing Machine (Singer 127). Today I learnt about The Hemmer Foot.

I would like to ask any sewing machine experts to please point out anything I'm doing wrong. I'm a self taught sewer and am learning about the machine by working my way through the manual.


I would have to say that the narrow hemmer foot is one of my most favourite sewing tools. It ranks right up there with a sharp pair of sewing scissors. A hemming foot is amazing! It can be used to make a very narrow hem (less than 1/4 inch of fabric used), for making a very narrow enclosed seam called a felled seam, and for a few other things.


To make a hem using this foot, place the fabric wrong side up. Press the edge that you are about to sew over about 1/4 an inch (a little less is good) for most of an inch along the edge. You can use your fingers for this like I do, or you can get out your trusty ironing board.


Place this folded over section under the pressure foot.


Sew two stitches and on the third stitch, stop with the needle in the fabric. Work the edge of the fabric gently up into the swirly part of the hemmer foot. You need to make certain you don't have too much fabric or too little, but knowing how much that is only comes with practice.


Continue to sew along the edge adjusting the direction of the fabric with your left hand and using your right hand to guide the hemming edge into the hemmer foot.


Trust me, it sounds simpler than it is.

I recommend that you practice and practice and practice before attempting this on your finished project. Good news! There's an easy and frequent way to practice this technique.


And there you have it. A tidy narrow hem accomplished in one swift pass of the sewing machine.


Have you ever brought fabric home from the shop, sewn something without washing the fabric first then have your effort shrink drastically in the first wash? Maybe you are smarter than me and have never had this happen; but, my very first sewing project when that way and now I wash every yard of fabric that I bring home. First. Before sewing.

Besides, there are a lot of chemicals and sizing that goes into cloth these days and I don't like being exposed to nasty toxins while I sew so I wash out as many of them as I can.

If you just bring the fabric home and stick it in the washing machine, the cut edge frays and you end up with (sometimes quite a bit) less fabric than you started with. If you sew a quick zig zag stitch along the cut edges, then it really cuts down on the fraying.

Or, you could practice your awesome hemming foot skills along the cut edges of the fabric before washing it.

It's a great opportunity to practice. You have a nice long streight edge and it's not going to show in your finished project.


A few other things you can use this foot for:

  • You can make a narrow felled seam (more on that later I hope)
  • You can add lace while hemming (I don't have any lace on hand at the moment, so I cannot show you that just yet)
  • You can use it to finish the edges on seams
  • you can hem with it.
  • I like to use it for the inside edge of the facing on blouses.

A few pointers for using this hemmer foot:

  • First and foremost do a nice large sample on the same fabric that the finished hem will be on. The thread tension is all different for this than for regular sewing and takes a while to adjust.
  • Remember to check the underside (right side) of the fabric as you sew as that's the side that will show.
  • Use a sharp needle. Some reason dull needles make the whole thing messy.
  • Works best on thinner fabric like quilting cotton or thinner.
  • I've never tried it on knit fabrics, but I know it works well on woven
  • It makes a great edge for handkerchiefs
  • Just have fun with it. It's a great little helper and you never know when an occasion to use it might present itself.
Oh and one more thing: Don't do the back stitch thing to secure the stitching. Tie the individual threads in a knot at each end when you have finished sewing. If you are just putting it directly in the washing machine, you don't really need to do that, just leave about an inch when you clip the threads. I've never had it unravel.

Tuesday, February 08, 2011

Restoring an electric Singer 99


I'm still working on the Singer 99 electric sewing machine. I wonder if it had ever been cleaned before. There are areas underneath the bobbin area that I thought were solid metal. But on further investigation, turned out to be just lint. Solid lint!

I've managed to get everything moving by putting a bit of oil at all the oil points, working it in, clean out any lint that becomes obvious, put another drop of oil in each oil point, work it in, clean out any lint that becomes obvious, put another drop of oil.... for three days now. I keep leaving it for a while so that the oil can soak in then spend another hour or two working on things.

There is lots of corrosion where the lint was thickest which helps to bring home how important it is to clean your machine before storing it for any period of time. The lint gathers moisture and moisture plus metal tends to be bad.


While cleaning the machine, I noticed something that I don't know if it is right or not. Behind the nob for the upper thread tension, inside the machine, is a spring and a lever that interacts with the spring when the pressure foot is down.

Here is what it looks like on my Beautiful Sphinx, a treadle powered Singer 127.


It's what I think it should look like. But on the Singer 99 machine it appears to have fallen down so that it doesn't have such a positive interaction with the pressure foot lever thingy. See?

I know, you have to squint to see it down there. This machine is no where near as photogenic as my treadle one.

So I was wondering, is the spring in the right place or should it be higher up directly behind the tension nob on the front?


Sunday, February 06, 2011

Handspun Yarn to Dye


I've been spinning more of this Wavy 2ply slub yarn from Corriedale roving. I have 3 skeins going down to the shop tomorrow to put up for sale.


This stuff is so soft and consistently slubby. It has such a soft hand but is very strong. I think it's the best novelty yarn I've made in a long time. It's easily reproduceable, which means that if someone wanted some made out of coloured roving, that could be arranged.

What I would love to see is for someone to take it home and dye it. I imagine it would take up the dyes really well, the areas with tighter twist would take the dyes differently than the areas with less twist.


Speaking about yarns good for dyeing: I saw that there was still a skein of the white Cotswold Boucle still for sale at the shop. Yet another yarn prefect for dyeing.


Perhaps if one of you readers of this blog out there happen to buy and make something with my yarn, you could let me know.

Friday, February 04, 2011

Hand sewn corset eyelets


Of course one could use grommets, but why spend the money when you can subject your hands to all sorts of pain by sewing the eyelets by hand?


I used an awl to make each of the 16 holes required for lacing this corset.


The great thing about an awl is that it does not sever the individual threads of the fabric, rather it pushes them out of the way in order to make the hole, thus keeping the integrity of the fabric in tact which makes the eyelets stronger.

And here is my sample piece where I played around with different size holes and button hole stitches.


Sure, I didn't use the button hole stitch so often found in the sewing books, but I liked the look of this better. I don't know if it will be as strong, but it does have a cleaner finish.


Thursday, February 03, 2011

Singer 127 - Getting to know feet


I don't know if this might help or interest anyone out there, but I'm putting together a series of Getting to Know my Antique/Vintage Singer Sewing Machine (Singer 127). Today I learnt about feet.

I would like to ask any sewing machine experts to please point out anything I'm doing wrong. I'm a self taught sewer and am learning about the machine by working my way through the manual.


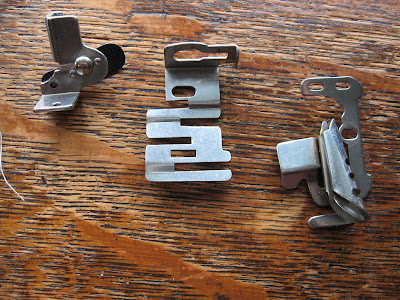
My Vintage Singer Sewing Machine came with feet like you wouldn't believe.


I can only recognize a few of these and most of those I don't know what they do. It is going to be fun to learn.

The sewing machine may be limited as to what it can perform, but there was a gadget for everything.

I love gadgets.

I'm really eager to learn how these will work.


I think they might just be for making hems of different sizes. At least that's what I hope they are for.

I'm also really want to find out how this things works.


I think it is used for applying bias tape and other edgings in one smooth step. Sounds like the perfect thing for binding those armhole seams. I will have to go ask the people at ravelry if these are indeed the parts that go together.


And in other news. I wanted to do a demonstration for you all (and for myself) to show all the cool things you can accomplish with the hemmer foot. Unfortunately it didn't fit properly into my machine. Even with the pressure foot raised to it's highest position, there was not sufficient clearance for the fabric to slip between the foot and the feed dogs. Hmmm... is this what they could mean by high shaft and low shaft pressure foot? This requires more study, but I did take some photos of the offending attachment and the pressure foot that was in the machine and is known to work well.


Perhaps someone might be able to tell me more.


In the mean time, I have heddles to thread.

Wednesday, February 02, 2011

Singer 99 - knee powered!

It's a good thing I went to feed the chickens before attempting to remove the red felt from near the bobbin. Thank you everyone for your help.

Things I learnt today: This is a Singer 99K-13, made in 1924 in Scotland. They made 50 thousand of these exact machines in one run. I'm just baffled by how many machines they made in that factory that year.

Considering how long these machines last (a hundred years is just a teenager for these old work horses) and how many they made, no wonder they are a dime a dozen. But if I can get this thing working, then I'll have a totally awesome portable sewing machine to show off to my friends. I'll just have to invent some sort of drool guard for it.

What else did I learn?

Oh yes, I discovered why sewing machine manuals always go on and on about not storing the machine without cleaning out the lint. Apparently lint left in the machine gathers moisture (especially when machine is stored in out building) which can cause rust and in my case, mould! I hate mould. Mould makes breathing difficult.

So, a person with mould allergies would be well advised not to try to clean an old anything in their house! Ug Spores!

But I did get the gears moving in the sewing machine. It's just stiff as anything. So I think, more cleaning followed by lots of oil.

Vintage Singer Sewing machine fetish


(I put fetish in the title of the blog, because recently I've had lots of people link here from rather naughty sites. I just wanted to mess around with them because this post has nothing to do with underwear, boobs, or sex.)


Last summer I was given a Vintage Singer sewing machine. It's portable and very pretty. The thing is, I don't know a thing about her. Since I have a sewing class I want to take in March, I need to fix her up.

The reason why I didn't take much notice before is that she's electric and I wanted either hand crank or better still treadle. I already have a fantastic electric machine that was my grandmother's and has a Zig Zag function. But, it's not portable.

It's time to turn my attention to Bentwood Box Electric Singer.


Right away I cut off the electric cord. I just wasn't safe and I didn't want to be tempted to plug it in.


I thought that a new cord was all that was needed, but apparently I should have taken a closer look. Is it suppose to have felt in the bobbin area?


The parts that should move are very reluctant. Hopefully a good cleaning will do it.

Tuesday, February 01, 2011

Making an Elizabethan Corset Muslin


As much as I admire corsets, I just don't know if I'm going to enjoy making them. I mean, it's a lot of hard work. A simple corset takes around 40 hours for a professional. And the materials! Boy they are expensive. The proper material (a tightly woven herringbone twill) averages around $30 per meter plus shipping. Then the pattern, bones, the busks, the laces, the eyelets....

Given my limited financial resources, I figured it would be a good idea to make a muslin or sample garment first before I invest in the real thing.

There is a free pattern for an Elizabethan Corset here. Because it's more affordable, and to quite frank, it looks far more comfortable, I decided to use Hemp Cord for my corset bones. I bought some muslin fabric from my local fabric shop. It's cotton and a very similar weight to quilting cotton. As for the eyelets, I think I'll try sewing them by hand. I still have to make a wooden busk for the front but I can make that out of a spare bit of oak flooring. It ends up being less than $10 to make a sample corset to see if I enjoy the process.


And I do enjoy the process!

It only took me 2 hours for drafting the pattern, 10 hours for machine sewing and threading the bones including my sample piece.


See? Awesome sample piece for practising techniques.

I bent a bit of Bonsai wire to thread the cord through the channels. This wire is very soft so I could quickly and easily smooth the cut edge with a bit of sandpaper.


So there you have it. I've done all the machine sewing. My antique Singer sewing machine had no trouble sewing through the hemp cord. It didn't even notice it was there.

Now I have about 20 hours of hand sewing left to do. Ug!

Thing is, I'm not entirely confident that this is the right shape. I didn't make it as long in the front as the Elizabethan Corset. Quite honestly, I think this looks more like a squashed bat than something I could wear. But even if it doesn't fit, I have had the opportunity to learn the skills I need to make a better one next time.


And believe me, there will be a next time.


A couple of notes and observations:

The fabric I used is quite stretchy. Not as much stretch as quilting cotton, but still, I don't think it will be up for the task of being a corset. Who knows, I might be wrong. But the goal was just to learn the techniques and find out if this pattern works.

Also, even though the antique Singer sewing machine had no trouble sewing through hemp cord (it didn't even notice) the needle quickly became blunt. Also, I used my second best fabric scissors on the hem cord. They really need sharpening now. The moral of the story: coarse hemp cord (this had lots of tow in it) makes things dull.

And I didn't hand sew the bias tape down like is recommended. I think it would make a much nicer effect and more comfortable corset if I had. But I'm eager to get this muslin finished so I stitched in the ditch instead.

And, sorry about the picture quality on some of these. The lighting is just not good at 11 at night.

Thoughts on corsets

I have been wondering about the dangers of wearing a corset.

From what I've read, if fitted properly a corset can really improve your posture. People have been wearing something like corsets for hundreds of years, yet bras have only been in popular use for a blink of an eye in comparison. Yet, popular opinion says that corsets are dangerous, confining and a symbol of male dominated society. But why is that?

I've seen all sorts of pictures of how wearing a tight corset can harm your bones and internal organs. But this is extreme and not always verifiable.

Besides, there are several modern day garments that can cause serious damage. Skinny jeans can cause digestive problems. The wrong size bra combined with running for the bus has broken more than one collar bone.

Like anything else, it's a matter of taking the time to educate yourself. It is also important to think about why you choose this garment.

For me, it's not a mater of reducing my waist. I know this is important for some people, and for those who feel it necessary there are steps to take so that wearing a tight corset does not adversely affect your health. It can take years to train your waist using a corset.

What I want is to provide support for my generous endowment and stop this pesty back ache.

I'm actually very worried that wearing a corset will put a lot of pressure on my digestion, especially my stomach. But then again, even a well fitted bra can do that sometimes.

I know. It seems like an overly elaborate justification for playing with corsets. But you know what? I'm fully willing to admit that I think they are cool! I've always been fascinated with the care and time that goes into making one. I think that constructing corsets will be an excellent way to improve my sewing skills (and play with my antique sewing machine).