Showing posts with label Singer 127. Show all posts

Saturday, April 08, 2023

Unexpected yarn

What unexpected yarn has fallen into your life?  Do you have a go-to project you love to make with found yarn or do you wait to see what the yarn says it wants to be?  


About a year ago, I stumbled on some free yarn, leftovers from the now closed local mill. Talking to people who used to work there, this was part of calibrating the spinning machine, so it contains a lot of different fibres from a variety of farms.  Most of them are less than a day's journey away.


So I made a thing.  And I made a video about the thing.  And the yarn.  And deep thoughts about the yarn, fibreshed, and my personal textile history.


Thursday, March 16, 2023

Petticoats and possibilities - my quest for a capsule wardrobe continues

 Layers!

Hens are great layers.  But even better are clothes layered on top of each other.  It transforms a seasonal outfit into a multi-season extravaganza!  

Winters on the farm are muddy, mucky, bloody, and occasionally snowy.  I do a lot of laundry.  

Come lambing season, I can do two or three loads of laundry a day.  

So I want farm clothes that wash well, like cotton.  Only the problem with cotton is that it's not very warm.  It actually, what's the opposite of warm?  A single layer of cotton is terrible for working outside in the winter because if the cotton gets wet, it chills the human and can cause health issues.  So we could be forgiven for thinking that if a single layer does harm, a lot would do more.  

Layering the clothes creates air gaps that allow the skin to breathe and provide insulation so I can stay outside longer to get things done.  And since I often wear skirts or dresses when working on the farm, I can take my fall and spring cotton skirts and transform them into winter skirts by adding a petticoat or two underneath.  


This matches well with my capsule wardrobe goals. 


Sunday, October 23, 2022

Further adventures of the Duffle Coat - pattern problems

 It's been difficult to work on my Albion Coat when the weather has been so warm.  But the rains are trying to break through and it's now cool enough in the mornings to light the woodstove until the sun is high enough to heat the house.  

So I'm spending that half an hour of coolness between the time I light the fire and my coffee is finished brewing and ... what's a good way to say "getting drunk" without it sounding like my coffee is boozing it up at 6am?  Anyway, I'm spending that time working on my Duffle Coat.

The worst part so far was cutting up the paper for the PDF pattern.  There is so much wasted paper in this pattern (and yes, I checked the measurement to make sure it was printing the right size).   It's especially noticeable after working on that free PDF pattern for my cloak where I didn't have to cut up any pieces of paper.  Here, I'll show the difference.


The pattern on the left is from the cloak, the one on the right is from the Albion Duffle Coat.  Both are formatted to print on North American or Metric paper, and yet here we are.  So much wasted space on the right one.  I feel like they could have reduced the paper by almost a quarter by doing better with the margins.

Saturday, October 08, 2022

Sewing a homegrown cloak - Mood winterberry cloak pattern

Wow, I may have just jumped the shark here, but I did it.  I made a cloak, entirely by hand, using traditional methods, from sheep to finished clothing!


For those of you new to the adventure, you can catch the full playlist here.

Basically, I gave in to peer pressure and put my life on hold to make this cloak.  It turned out amazing, but I still have a lot of work to do to finish it up.  Something to keep me busy this winter.

I want to talk about the pattern because the video was long and I edited that bit out.  Also I don't really feel qualified to assess a sewing pattern as a complete N00b!

Saturday, September 04, 2021

Sewing - the narrow hemmer foot

This last year I've been learning a lot about sewing.

It turns out it takes less time and money to sew my own clothes than it does to try to find something that fits both my style and body.  But sewing means I can make what I want to wear and make it fit.

I do my sewing on my Antique Singer 127 (which is now about 105 years old!).  It's such a kind machine and forgiving.  

One of my favourite feet is the narrow hemmer foot.  It's a bit tricky to use until you figure out that the fabric edge lines up with the edge of the foot before folding over.  Hard to explain, so I made a video:


If you like this sort of thing and want to see more of it, here are some things you can do to support me on my youtube journey.

- go to youtube and give me a thumbs up!  Or even a subscribe!  That would be awesome
- or pop over to my Etsy shop and support me that way.

Tuesday, December 04, 2012

How to clean a Vintage Singer Sewing Machine, Singer 127

December is a month of holiday celebration   It is also the month I like to give myself a treat and clean, clean, clean.  The goal is to have a tidy living space in time for the beginning of the new year.  I'm not all that fond of the process of cleaning, but I do like a tidy house, even if it never seems to last long.

I'm starting this month off by cleaning my main sewing machine, my Singer 127 treadle.  If I have a chance I might take apart the treadle base later, but for now I'm just giving the machine a check up and tidy.


Please keep in mind, the process to clean an active vintage sewing machine is a little bit different (and a lot easier) than cleaning one that has been in an attic for most of the century.

I'll walk you through my process for cleaning.  Different people do things differently and there is slight variation between machines, but generally any pre 1948 machine follows the same basic process.  Actually, it will work with most pre 1990 machines, but it's always good to check the manual before tampering with the newer machines.


Things you need to clean your vintage sewing machine

  • cotton swabs
  • good sewing machine oil
  • flat head screwdriver
  • a used sewing machine needle
  • paper towel
  • sewing machine
Start at the top and gently wipe any dust off the outside of the machine with a paper towel or tissue and a tiny bit of oil.

From here on in, at each step, check for any signs of wear or metal scraping on metal.  This will appear shinier than the surrounding metal.  Stop!  I said STOP!  A this point and find out why.  Fix it!  then keep going.  If you don't fix it, your machine will break, and then you can't sew on it until you undergo major repair.  

Also, please see the manual specific for your machine for the oil points.


Next, take off the face plate at the front end of the machine.  Remove any lint or excess oil that has gathered inside during the year (or longer).  Generously oil the needle post (the thing that goes up and down with the needle on the end) and any moving parts you can see.


Also oil at the top of the needle post thingy.


At the front of the machine there is a trapezoid plate.  Some machines have an opening at the back instead.  Some have both.


Open it up, remove any lint or visible puddles of oil.  Lubricate any moving parts and inside the grove (it's kind of hard to see, but if you turn the crank wheel slowly the same direction you would normally sew in, you can see it.


While we are at the front of the machine, clean any lint and oil your bobbin winder.


At the back of the machine is a circular plate, like everything else, clean any visible puddles of oil (there really shouldn't be any here as they only tend to form in the first two.  Oil where it says to oil in your manual (or anywhere things move).


Place a drop of oil in each of the holes at the top of the machine.


Now it's time to clean the bobbin area and the feed dogs.  This place tends to get linty fast.  I find that the used sewing machine needle tends to be excellent for fishing lint out of those hard to reach places.  Check your manual if your machine differs from mine.


Remove the plates, bobbin and if applicable bobbin casing  clean out any visible lint.  Make sure the feed dogs are happy and don't have any obvious damage.  Check to see if there are any needle marks in teh feed dog plate - this is a sign that you are doing something wrong (either using bent needles or tugging at the fabric) or that your machine is royally F-ed up.  Preferably the former.  

Do not oil or put this part back together yet.  Instead, disengage the treadle band and turn your machine on it's back so you can see underneath.


Clean all the lint you can find. Oil according to the manual (or one drop on each moving spot).

Put machine right way up and check again for lint (there is bound to be more that didn't show up the first time).

Oil the racier track and anywhere else that it tells you to in the manual.


Remove the bobbin from the shuttle and take the shuttle apart   Check for burs or anywhere that might snag the thread.  Clean and wipe down with a paper towel that has sewing machine oil on it.  Use a cotton swab to clean the inside of the shuttle, especially the bottom.  Place one very, very small drop of oil in the bottom of the shuttle and reassemble.  


Check for signs of wear on the outside of the shuttle - for example where the needle might be hitting it or it might be rubbing on the racer track too much.  This is a sign that things need adjusting.


Get some scrap fabric and thread.  Sew a whole bunch of stitches.  It will get the fabric oily, so make sure you use scrap.  Adjust the tension as necessary.


This takes me about 20 min if I don't keep stopping to snap photos for my blog ;) however, on a machine that isn't used very often or properly maintained, this task can take hours or even weeks to acomplish.


Tuesday, May 08, 2012

Singer 127 - Disassembling the Upper Thread Tension thing

I don't know if this might help or interest anyone out there, but I'm putting together a series of Getting to Know my Antique/Vintage Singer Sewing Machine (Singer 127). Today I learnt about taking apart the upper thread tension device thingy.


I would like to ask any sewing machine experts to please point out anything I'm doing wrong. I'm a self taught sewer and am learning about the machine by working my way through the manual.


Recently I had a request for photos of the upper thread tension mechanism on the Singer 127.  I thought what a great excuse to take one apart, and since I had a parts machine just sitting out on the table... well here's some photos.

Tension device on a Singer 127


A while back I needed a new tension spring for a sewing machine, it was that modern Singer class 15 clone from India.  I tell you, it was a real pain in the *ahem to replace.  I ended up buying a spring from the local sewing machine repair shop, spent almost 10 hours trying to make it fit (okay, more like 3 hours), only to finally figure out that the spring was wound the opposite way to what I needed.  Live and learn.


Turn counter clockwise, be careful not to damage the threading.


The bits I removed, from left to right.  I've even managed to keep them in the direction I removed them from the machine (this time).

This little piece of mettle is from inside the bigger piece of mettle.  I wish my brain was feeling fit enough to find the right word, but basically, there is a mechanism inside the machine that makes it when the pressure foot is up, there is less tension on the thread to allow it to flow freely through the tension device, and when the pressure foot is lowered, an arm rests on this little bit of mettle to increase the tension on the thread.  Apologies for the lack of words, I really don't write as well in the evenings.


Here is the upper thread tension mechanism on my favourite machine.  It's also a Singer 127, about 15 years older than the one I just took apart.


I didn't notice this before, but this is actually assembled in the wrong order.  Hasn't given me any trouble yet.  Next time I give it a full cleaning, I'll fix it.


Saturday, April 21, 2012

Zombies are after me in my dreams.

Picked up this bracelet made from a fork recently from CandleBrightCreations on etsy.


The Lord of the Rings quote, "Not all who wander are lost" is somehow printed into the metal.  Personally, I think it's fantastic, and even if I had the tools to make this I don't think I could ever come up with the idea on my own.

An old, everyday object, transmogrified (great word Transmogrified) into something familiar yet unique.  It represents moving forward in a way that is no longer wasteful like our throwaway society.  Honouring the past, yet forging a new style.  Cutlery always reminds me of civility - so many pages of etiquette manuals are dedicated to which spoon goes with which course.  And yet, there is something so earthy about this kind of item as jewellery.

This bracelet inspired me to make a 'matching' necklace.


The necklace is made by putting a jump ring on a vintage sewing machine shuttle (Singer 127).  I can wear it around my neck in case of emergency.  Given the way my life has been going lately, you never know...

 It's from an old machine I'm toying with.  The body is quite rusty, so I might take it all the way apart just to see how it all works... not sure if I want to put it together again or make more jewellery.  But that's a project for another day.


Something I haven't told you yet, I've been having bad dreams.  

We are talking so scared when I wake up I can't even turn on a lamp for fear that the zombies will be see the light and burst out of my dream and through the window, so I lay awake in bed shaking, for 6 hours until the sun comes up - that kind of bad dream.

The dreams are about zombies.  Two nights ago one of them bit me.  He wasn't a real zombie... well he was, only he got sort-of cured.  His mind was cured, but he was still rotting and stinking like a zombie (dream zombies smell terrible!).  Freud would know what to think of that, I sure don't.

I was thinking maybe I should warn everyone about my zombie bite.  Instead of wearing a sandwich board sign around my neck, I found a far more fashionable way to declare my condition.


Better sell some more yarn so I can get this quick, before it's too late.

Tuesday, April 17, 2012

Singer 128 - How to use the vintage buttonholer (it makes button holes so you don't have to)

I don't know if this might help or interest anyone out there, but I'm putting together a series of Getting to Know my Antique/Vintage Singer Sewing Machine. Today I learnt about The buttonhole attachment.

I would like to ask any sewing machine experts to please point out anything I'm doing wrong. I'm a self taught sewer and am learning about the machine by working my way through the manual.


This is a Singer 128 hand crank sewing machine.


It's a nice little portable machine and takes the same bobbins and shuttle as my Singer 127.

I need to make some button holes, and just in case you didn't know yet, these vintage machines don't do a zig-zag stitch.  Gasp!  Whatever will I do?

Never fear, I have an attachment for that!

Vintage Sewing Machine Buttonholer attachment

The buttonholer, or button hole attachment is a marvellous thing.  It works on almost any of the old straight stitch vintage machines with a low shaft foot.  I think you can get a high shaft one, but I have yet to see it.

Very First thing to do is to check your thread tension.

The first second thing you need to do in order to use the buttonholer is to cover the feed dogs.  They are the teeth that move the fabric along while you sew.  The instructions are to use this little plate that comes with the buttonholer to cover the feed dogs.  It just floats over top of them so that they don't get damaged.

Vintage Buttonholer feed dog cover


If you don't have a plate like this, another option would be to remove the feed dogs temporarily while you use the attachment.  You need a screwdriver and to get underneath the machine.  I haven't tried this yet, but I'm told it's fairly easy as feed dogs often need to be replaced over the years.

Next you set up the buttonholer with the right size cam.  There are a bunch of different size templates that can go inside the buttonholer to make different size button holes.

Vintage buttonholer attachment cams

upside-down buttonholer
Now for the real tricky part, attaching the buttonholer to the machine.  There is an arm that needs to go over the screw that holds the needle in place.


And a bar that attaches to the pressure foot vertical-up-down-thing-I-can't-remember-what-it's-called-right-now.


Insert the fabric between the feed dog cover plate and the buttonholer.  Lower pressure foot.  Sew as usual.  In theory the buttonholer will hold the fabric for you and move it as needed, so all you need to do is make certain the thread does not tangle, the machine moves at an even pace and the weight of the fabric does not pull at the sewing.

Not so sure about this 'add caption' option, what do you think, is it helping?

buttonholer in action
 The thing I don't like about this attachment is that if you want to change the size of the button hole, you have to take the entire thing off the machine, change the cam, put it back on again.  The manual suggests that you make a test strip of all the different sizes.  I might just do that when I get a chance.


Buttons are happy, the hole fits!


Friday, April 06, 2012

How to make Zines Zine - or a swift kick in the pants to get me going


When I saw the title, I couldn't help myself. How to Make your very own Zine! (it's super easy), by Casey Bradley.


I even got a little hand drawn picture on my envelope. It made me smile!

This zine is exactly as promised, a little booklet about how to make more little booklets. It's full of useful information, awesome drawings (I just adore the drawings), and a swift kick in the pants for me to stop procrastinating and get back to work on my own poor efforts.


All these tools just to make one little zine. I don't know. (shakes head in a bemused fashion, at self)

I was procrastinating because, I'm way earlier than I said I would be (last week of each month isn't for ages yet) and because I wasn't confident I could sew fabric swatches onto paper with my old machine. Oh me of little faith. The machine thought nothing of it and the only complaint it made was that I waited so long to play with it.

April's Crowing Hen Guide to Household Management is Finished! It's all about washing fabrics, yarn, &c., by hand. It's a bit more text heavy than I would have liked, but I make up for that by not adding as many terrible line drawings as normal. :)


Sunday, April 01, 2012

A rusted sewing machine, mystery steampunk project and playing with my typewriter


Found some neat stuff at yardsales yesterday. Among them yet another Singer 127 sewing machine on a treadle base for next to nothing. Problem is, it's in absolutely rotten shape. Everything's rusted, including the treadle base. However, it does have some parts on it that I can use to repair this 128 I have hanging around. Perhaps the left over parts could be used for art part of my mystery project? What do you think? Do manual sewing machines seem steampunkish to you?


I also found these nifty tags.


Of course, this means that I had to play with my typewriter. But I don't need much excuse for that.

Friday, March 04, 2011

The Victorian Corset Kit - almost halfway done


I talked earlier about my goal to learn how to make corsets. I got this idea in my head not because I want to make myself look thinner or more shapely. On the contrary, I tend to wear clothes that do the opposite. Rather it's a mater of weight distribution. I have a rather large endowment that creates an even larger back ache. Modern bras in my size are expensive and difficult to find. So why not learn more about corsets?


Farthingales offers a Victorian Corset kit. It's just right for beginners like me. It has everything needed to make your first corset. I would say the sewing skills needed are very basic: Sew straight stitch, use a zipper foot, and apply bias tape. The ability to measure is important. But the most important skill needed to create this corset is the ability to follow directions!

My antique treadle machine (a Singer 127) is the perfect machine for this. It is fast, effortless to use, and every stitch is under my direct control. I'm very happy with how it sews and it doesn't even seem to notice that this fabric is as thick (and as stiff) as poster board.


One thing I have been learning about is how to make things fit.

Please forgive my horrid photos - I'm not use to photographing myself in the mirror.


This is at the stage before I sew the bone channels.

Lacing it this tight makes it feel like a strong hug. There is no pain or restriction of breath. The stomach ache that I was worried about before I tried the corset, magically disappeared while I was wearing it but returned afterwards.

I'm wondering if I might have chosen a size too big. The hips feel comfortable, the waist could probably be tighter, but maybe not.

The bust, however, feels all wrong.

I've already taken the bust in 2 inches on each side, but it's still quite loose. I was hoping that it would make my bust feel all squishy and supported, but mostly it's, well, not.

I think it's also too high. I'm going to take 1/2 to 5/8th of an inch off the top.


This is a size 14 Dore version of the Laughing Moon Victorian Corset, with a D cup.

So, any corset experts out there? Thoughts? How can I improve this? What should I do differently for my next corset? Will adding the bones improve how it fits the bust?

Thursday, March 03, 2011

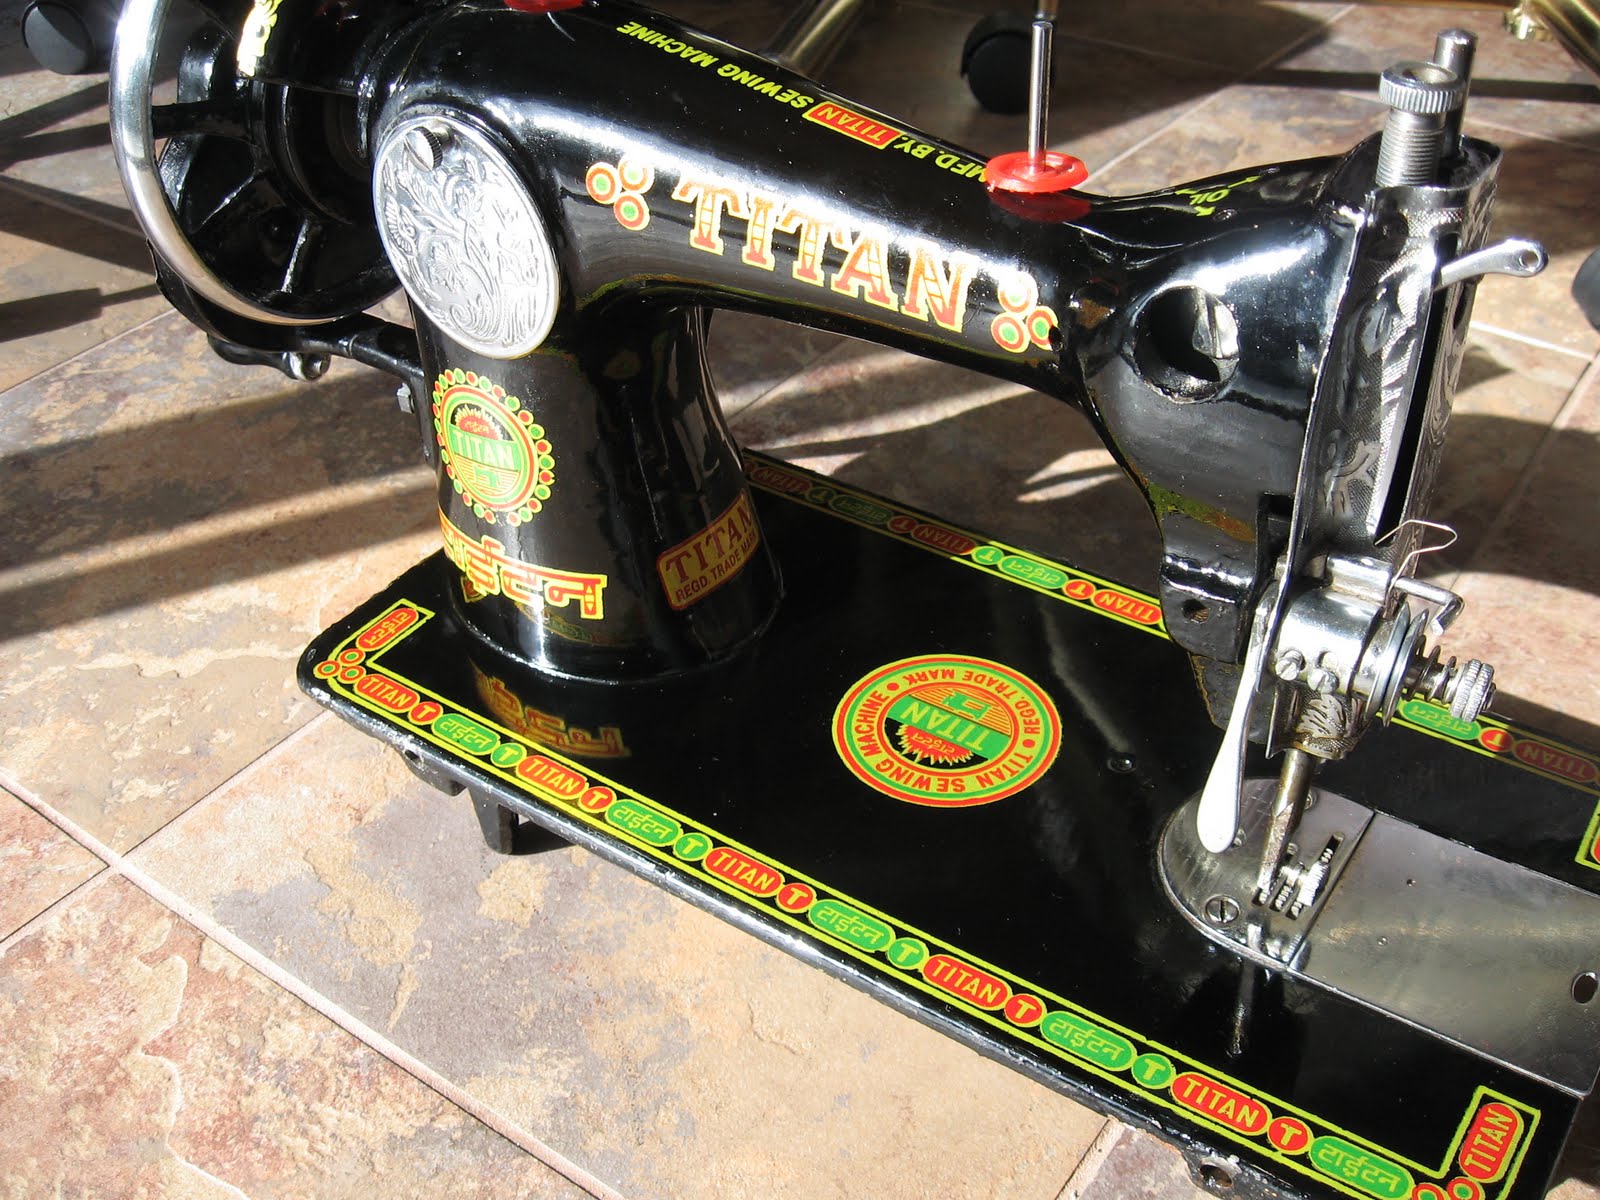
Titan Special sewing machine from India - Not an antique sewing machine


People don't take things apart enough any more - Though it is for good reasons, I suppose. I think society trains us to be afraid of the innards of things. Taking apart a something to see how it works might void the warranty, or worse, expose us to some of those highly dangerous chemicals that they use to make electronics these days.

It seems to be a generational thing as I hear stories of how so and so took apart their dad's radio or bicycle and put it back together again, and even though it worked, they had all these spare parts left over. At which point in the telling of the story, everyone chuckles.

This sort of activity use to be a right of passage - but now a days you would be foolish to take a part a radio without specialized equipment and a hazmat suit. We have gone a bit beyond the word of vacuum tubes.

And I think that's a real shame. We are one step further away from being self reliant. Instead of having the time and skills, not to mention the hazmat suit, needed to make simple repairs, we spend more time working so we can spend more money buying new things to replace the slightly broken things in our life.


The chickens bought me a sewing machine for my birthday. Very nice of them too.


It's from India, and despite appearances, is very new to this world. Only about 5 to 10 years old, maybe less. Although, it does look like an antique sewing machine and it even has a hand crank to make it operate. So it has the same technology as the vintage sewing machines. It also has only one plastic part: the crank handle. Unlike modern machines it has no electrics, no electronics, and no plastic bits inside to wear out.

I wonder if it will still sew 94 years from now (the current age of my treadle powered Singer 127, Beautiful Sphinx). It's not as well made as the antique sewing machines, but it is perhaps, better made than many modern machines. It is also much easier to repair.

The machine is made in the style of a Class 15 clone. Which is good news for me because this manual (pdf) covers most of what I need to know to make it work such as threading diagrams.


When I brought her home, she didn't work. This is where the taking things apart comes in. At first, I was very nervous. I obsessively took photos of every stage so that I would know how to put it all back together again.

I could manage a slight wiggle from the machine, but that was it. Even with the clutch engaged, the main wheel kept going without moving anything. I couldn’t see any lint (anywhere - which made me wonder if it had actually been used) or any obvious jams. It did have a heavy grease or motor oil on all the parts that should move. It had hardened to a horrible wax like substance which I suspect did more harm than good.

So I took it apart the wheel to see if the clutch was working. Aside from more wax/grease, it seemed to be fine. I couldn’t turn the shaft, so I decided to put it back together and try something else.


Next, I spray WD40 on all the gucked up parts. Don’t worry, I rinsed it out with sewing machine oil afterwards. Still no luck getting it to move, but now there is the sound of metal on metal. Hmm…

I followed my ears, and found that it was coming from the bobbin area.


Realizing I should have started here, I took it all apart…


… and found the problem.


Such a small bit of thread and yet it prevented the machine from working. I suppose this means that the machine must have been used at some point in the past.

I reassembled everything, oiled with sewing machine oil, and ran the machine. Listening for anywhere it is running rough, applied more oil, ran the machine some more.

Now it runs very smoothly. I just have to make some thread guides (the only parts missing) before I can try sewing on it. I won't know 100% if it works until then, but fingers crossed.


My favourite things about this machine are the decorations (is that Hindi?), the fact that it has metal parts instead of plastic ones, that some parts like the face plates are hand fashioned, possibly out of reclaimed materials and that the brand Titan is also stamped on the parts inside which means that it is not just something they painted on the outside. I also like that it's a hand crank machine that was built not for decoration, but for use; for modern day use to boot.

Less happy with the fact that I don't think it's as well built as my antique and vintage machines. But it is built to last longer and be easier to repair than fancy modern day machines made for the American market. I also don't like that the paint is chipping in a few places. I'm also not fond of how heavy this beast is. It's portable in so far as you don't have to have a treadle base and table with it. It is not something I want to carry around with me on a long walk.

I think this will be a good machine for sewing in unusual places. If it works, I plan to use it at an upcoming workshop where I need to bring my own sewing machine.