I would like to ask any sewing machine experts to please point out anything I'm doing wrong. I'm a self taught sewer and am learning about the machine by working my way through the manual.
Recently I had a request for photos of the upper thread tension mechanism on the Singer 127. I thought what a great excuse to take one apart, and since I had a parts machine just sitting out on the table... well here's some photos.
 |
| Tension device on a Singer 127 |
A while back I needed a new tension spring for a sewing machine, it was that modern Singer class 15 clone from India. I tell you, it was a real pain in the *ahem to replace. I ended up buying a spring from the local sewing machine repair shop, spent almost 10 hours trying to make it fit (okay, more like 3 hours), only to finally figure out that the spring was wound the opposite way to what I needed. Live and learn.
 |
| Turn counter clockwise, be careful not to damage the threading. |
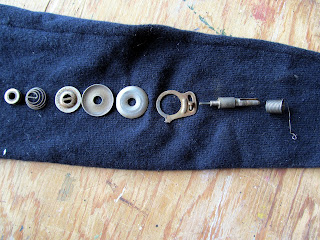
The bits I removed, from left to right. I've even managed to keep them in the direction I removed them from the machine (this time).
This little piece of mettle is from inside the bigger piece of mettle. I wish my brain was feeling fit enough to find the right word, but basically, there is a mechanism inside the machine that makes it when the pressure foot is up, there is less tension on the thread to allow it to flow freely through the tension device, and when the pressure foot is lowered, an arm rests on this little bit of mettle to increase the tension on the thread. Apologies for the lack of words, I really don't write as well in the evenings.
Here is the upper thread tension mechanism on my favourite machine. It's also a Singer 127, about 15 years older than the one I just took apart.
I didn't notice this before, but this is actually assembled in the wrong order. Hasn't given me any trouble yet. Next time I give it a full cleaning, I'll fix it.


3 comments:
Thank you for the detailed photos.
I've had a wicked cold, so I haven't been able to do much more than lye in bed feeling sorry for myself the last few days.
If you are still having trouble with that spring, let me know, I can take some more photos.
Basically, the spring (the one the thread goes on) is fairly loose, and you wind it at least 1/2 a turn and rest it on the little tab before you finish re-assembling the mechanism - That probably made less sense than I hoped due to the cold medicine messing with my brain. Let me know and I can try again in a few days.
Thank you. I am renovating a similar machine (just for fun) and couldn't work out how to extract the centre threaded stud, not wanting to damage it by forcing it. I wonder if it matters which way the spring is wound? I need a new one but the broken end of the old one seems to spring back from either direction.
Post a Comment