Tuesday, February 08, 2011

Restoring an electric Singer 99


I'm still working on the Singer 99 electric sewing machine. I wonder if it had ever been cleaned before. There are areas underneath the bobbin area that I thought were solid metal. But on further investigation, turned out to be just lint. Solid lint!

I've managed to get everything moving by putting a bit of oil at all the oil points, working it in, clean out any lint that becomes obvious, put another drop of oil in each oil point, work it in, clean out any lint that becomes obvious, put another drop of oil.... for three days now. I keep leaving it for a while so that the oil can soak in then spend another hour or two working on things.

There is lots of corrosion where the lint was thickest which helps to bring home how important it is to clean your machine before storing it for any period of time. The lint gathers moisture and moisture plus metal tends to be bad.


While cleaning the machine, I noticed something that I don't know if it is right or not. Behind the nob for the upper thread tension, inside the machine, is a spring and a lever that interacts with the spring when the pressure foot is down.

Here is what it looks like on my Beautiful Sphinx, a treadle powered Singer 127.


It's what I think it should look like. But on the Singer 99 machine it appears to have fallen down so that it doesn't have such a positive interaction with the pressure foot lever thingy. See?

I know, you have to squint to see it down there. This machine is no where near as photogenic as my treadle one.

So I was wondering, is the spring in the right place or should it be higher up directly behind the tension nob on the front?


Sunday, February 06, 2011

Handspun Yarn to Dye


I've been spinning more of this Wavy 2ply slub yarn from Corriedale roving. I have 3 skeins going down to the shop tomorrow to put up for sale.


This stuff is so soft and consistently slubby. It has such a soft hand but is very strong. I think it's the best novelty yarn I've made in a long time. It's easily reproduceable, which means that if someone wanted some made out of coloured roving, that could be arranged.

What I would love to see is for someone to take it home and dye it. I imagine it would take up the dyes really well, the areas with tighter twist would take the dyes differently than the areas with less twist.


Speaking about yarns good for dyeing: I saw that there was still a skein of the white Cotswold Boucle still for sale at the shop. Yet another yarn prefect for dyeing.


Perhaps if one of you readers of this blog out there happen to buy and make something with my yarn, you could let me know.

Friday, February 04, 2011

Hand sewn corset eyelets


Of course one could use grommets, but why spend the money when you can subject your hands to all sorts of pain by sewing the eyelets by hand?


I used an awl to make each of the 16 holes required for lacing this corset.


The great thing about an awl is that it does not sever the individual threads of the fabric, rather it pushes them out of the way in order to make the hole, thus keeping the integrity of the fabric in tact which makes the eyelets stronger.

And here is my sample piece where I played around with different size holes and button hole stitches.


Sure, I didn't use the button hole stitch so often found in the sewing books, but I liked the look of this better. I don't know if it will be as strong, but it does have a cleaner finish.


Thursday, February 03, 2011

Singer 127 - Getting to know feet


I don't know if this might help or interest anyone out there, but I'm putting together a series of Getting to Know my Antique/Vintage Singer Sewing Machine (Singer 127). Today I learnt about feet.

I would like to ask any sewing machine experts to please point out anything I'm doing wrong. I'm a self taught sewer and am learning about the machine by working my way through the manual.


My Vintage Singer Sewing Machine came with feet like you wouldn't believe.


I can only recognize a few of these and most of those I don't know what they do. It is going to be fun to learn.

The sewing machine may be limited as to what it can perform, but there was a gadget for everything.

I love gadgets.

I'm really eager to learn how these will work.


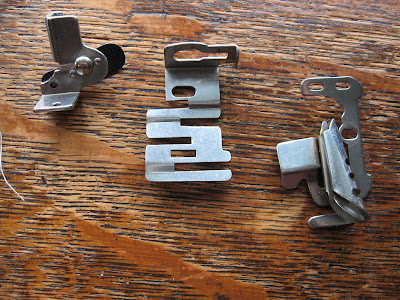
I think they might just be for making hems of different sizes. At least that's what I hope they are for.

I'm also really want to find out how this things works.


I think it is used for applying bias tape and other edgings in one smooth step. Sounds like the perfect thing for binding those armhole seams. I will have to go ask the people at ravelry if these are indeed the parts that go together.


And in other news. I wanted to do a demonstration for you all (and for myself) to show all the cool things you can accomplish with the hemmer foot. Unfortunately it didn't fit properly into my machine. Even with the pressure foot raised to it's highest position, there was not sufficient clearance for the fabric to slip between the foot and the feed dogs. Hmmm... is this what they could mean by high shaft and low shaft pressure foot? This requires more study, but I did take some photos of the offending attachment and the pressure foot that was in the machine and is known to work well.


Perhaps someone might be able to tell me more.


In the mean time, I have heddles to thread.

Wednesday, February 02, 2011

Singer 99 - knee powered!

It's a good thing I went to feed the chickens before attempting to remove the red felt from near the bobbin. Thank you everyone for your help.

Things I learnt today: This is a Singer 99K-13, made in 1924 in Scotland. They made 50 thousand of these exact machines in one run. I'm just baffled by how many machines they made in that factory that year.

Considering how long these machines last (a hundred years is just a teenager for these old work horses) and how many they made, no wonder they are a dime a dozen. But if I can get this thing working, then I'll have a totally awesome portable sewing machine to show off to my friends. I'll just have to invent some sort of drool guard for it.

What else did I learn?

Oh yes, I discovered why sewing machine manuals always go on and on about not storing the machine without cleaning out the lint. Apparently lint left in the machine gathers moisture (especially when machine is stored in out building) which can cause rust and in my case, mould! I hate mould. Mould makes breathing difficult.

So, a person with mould allergies would be well advised not to try to clean an old anything in their house! Ug Spores!

But I did get the gears moving in the sewing machine. It's just stiff as anything. So I think, more cleaning followed by lots of oil.

Vintage Singer Sewing machine fetish


(I put fetish in the title of the blog, because recently I've had lots of people link here from rather naughty sites. I just wanted to mess around with them because this post has nothing to do with underwear, boobs, or sex.)


Last summer I was given a Vintage Singer sewing machine. It's portable and very pretty. The thing is, I don't know a thing about her. Since I have a sewing class I want to take in March, I need to fix her up.

The reason why I didn't take much notice before is that she's electric and I wanted either hand crank or better still treadle. I already have a fantastic electric machine that was my grandmother's and has a Zig Zag function. But, it's not portable.

It's time to turn my attention to Bentwood Box Electric Singer.


Right away I cut off the electric cord. I just wasn't safe and I didn't want to be tempted to plug it in.


I thought that a new cord was all that was needed, but apparently I should have taken a closer look. Is it suppose to have felt in the bobbin area?


The parts that should move are very reluctant. Hopefully a good cleaning will do it.

Tuesday, February 01, 2011

Making an Elizabethan Corset Muslin


As much as I admire corsets, I just don't know if I'm going to enjoy making them. I mean, it's a lot of hard work. A simple corset takes around 40 hours for a professional. And the materials! Boy they are expensive. The proper material (a tightly woven herringbone twill) averages around $30 per meter plus shipping. Then the pattern, bones, the busks, the laces, the eyelets....

Given my limited financial resources, I figured it would be a good idea to make a muslin or sample garment first before I invest in the real thing.

There is a free pattern for an Elizabethan Corset here. Because it's more affordable, and to quite frank, it looks far more comfortable, I decided to use Hemp Cord for my corset bones. I bought some muslin fabric from my local fabric shop. It's cotton and a very similar weight to quilting cotton. As for the eyelets, I think I'll try sewing them by hand. I still have to make a wooden busk for the front but I can make that out of a spare bit of oak flooring. It ends up being less than $10 to make a sample corset to see if I enjoy the process.


And I do enjoy the process!

It only took me 2 hours for drafting the pattern, 10 hours for machine sewing and threading the bones including my sample piece.


See? Awesome sample piece for practising techniques.

I bent a bit of Bonsai wire to thread the cord through the channels. This wire is very soft so I could quickly and easily smooth the cut edge with a bit of sandpaper.


So there you have it. I've done all the machine sewing. My antique Singer sewing machine had no trouble sewing through the hemp cord. It didn't even notice it was there.

Now I have about 20 hours of hand sewing left to do. Ug!

Thing is, I'm not entirely confident that this is the right shape. I didn't make it as long in the front as the Elizabethan Corset. Quite honestly, I think this looks more like a squashed bat than something I could wear. But even if it doesn't fit, I have had the opportunity to learn the skills I need to make a better one next time.


And believe me, there will be a next time.


A couple of notes and observations:

The fabric I used is quite stretchy. Not as much stretch as quilting cotton, but still, I don't think it will be up for the task of being a corset. Who knows, I might be wrong. But the goal was just to learn the techniques and find out if this pattern works.

Also, even though the antique Singer sewing machine had no trouble sewing through hemp cord (it didn't even notice) the needle quickly became blunt. Also, I used my second best fabric scissors on the hem cord. They really need sharpening now. The moral of the story: coarse hemp cord (this had lots of tow in it) makes things dull.

And I didn't hand sew the bias tape down like is recommended. I think it would make a much nicer effect and more comfortable corset if I had. But I'm eager to get this muslin finished so I stitched in the ditch instead.

And, sorry about the picture quality on some of these. The lighting is just not good at 11 at night.

Thoughts on corsets

I have been wondering about the dangers of wearing a corset.

From what I've read, if fitted properly a corset can really improve your posture. People have been wearing something like corsets for hundreds of years, yet bras have only been in popular use for a blink of an eye in comparison. Yet, popular opinion says that corsets are dangerous, confining and a symbol of male dominated society. But why is that?

I've seen all sorts of pictures of how wearing a tight corset can harm your bones and internal organs. But this is extreme and not always verifiable.

Besides, there are several modern day garments that can cause serious damage. Skinny jeans can cause digestive problems. The wrong size bra combined with running for the bus has broken more than one collar bone.

Like anything else, it's a matter of taking the time to educate yourself. It is also important to think about why you choose this garment.

For me, it's not a mater of reducing my waist. I know this is important for some people, and for those who feel it necessary there are steps to take so that wearing a tight corset does not adversely affect your health. It can take years to train your waist using a corset.

What I want is to provide support for my generous endowment and stop this pesty back ache.

I'm actually very worried that wearing a corset will put a lot of pressure on my digestion, especially my stomach. But then again, even a well fitted bra can do that sometimes.

I know. It seems like an overly elaborate justification for playing with corsets. But you know what? I'm fully willing to admit that I think they are cool! I've always been fascinated with the care and time that goes into making one. I think that constructing corsets will be an excellent way to improve my sewing skills (and play with my antique sewing machine).

Monday, January 31, 2011

Singer 127 - winding the bobbin and trouble therein.


I don't know if this might help or interest anyone out there, but I'm putting together a series of Getting to Know my Antique/Vintage Singer Sewing Machine (Singer 127). Today I learnt about The bobbin.

I would like to ask any sewing machine experts to please point out anything I'm doing wrong. I'm a self taught sewer and am learning about the machine by working my way through the manual.


Hidden underneath a shiny silver face plate is a shuttle and bobbin. These magical treasures are what makes the sewing machine stitch lock in place. Two threads, one on top, one beneath, working together to make sewing happen. What could be more wonderful than that?

My Beautiful Sphinx, a Singer 127, came with a selection of bobbins and I figure it's time I learnt how to wind them.


The manual tells me to begin by disengaging the balance wheel. There is a smaller wheel inside the bigger wheel at the right of the machine. You turn the smaller wheel towards you and it stops the needle from going up and down while we wind the bobbins.

But I figured a better place to start would be to give the winding device some oil. It's been almost 50 years since last used.


I put a scarce drop of oil in the hole. I couldn't think of anywhere else where oil might go on the bobbin winder.

Put the bobbin in place, buy pulling on the left knob. Thread the bobbin winder and tuck the thread under the right end of the bobbin. Make certain the thread guide is all the way to the right side, press bobbin winder so that the wheel rests against the balance wheel. "Operate the machine the same as for sewing".


The instructions say it so much better.

But at the end, I had a happy little bobbin all ready for sewing.


And the sewing went lovely for a while. That is until the bobbin began acting up.


Somehow it didn't wind evenly so now the thread keeps getting tangled up at the same point.


ps. I have no idea what's going on here with the fonts the last couple of posts. Things I try to format remain unchanged, and for no apparent reason random parts of the text acquire random formatting. Look. Now it's underlined!

Sunday, January 30, 2011

Singer 127 - tension


I don't know if this might help or interest anyone out there, but I'm putting together a series of Getting to Know my Antique/Vintage Singer Sewing Machine (Singer 127). Today I learnt about Tension.

I would like to ask any sewing machine experts to please point out anything I'm doing wrong. I'm a self taught sewer and am learning about the machine by working my way through the manual.


Because the first thing to do when you bring a new toy into the house is play with it, I decided to dive right in and see how this baby works.

Please note: all my sewing machine parts moved freely, there are no nasty grinding sounds, and everything seems to be in working order. It things wern't in such a happy state, I wouldn't have dived right in and started sewing. Sometimes these machines get all rusty or the oil used by previous owners has gucked up the works and needs cleaning out. More on oil and antique sewing machines another day.

Also, before I go any further, I would like to ask any sewing machine experts to please point out anything I'm doing wrong. I'm a self taught sewer and am learning about the machine by working my way through the manual.


Now, back to the good stuff.

How exciting. Beautiful Sphinx has pride of place in my front room right next to the big window. I can look up from my sewing and admire the chickens scratching for worms outside.

Careful to obey the list of don'ts on pg 5, I am ready to take her for a test drive.


Something's obviously gone wrong. It must be tension.

According to the manual I can adjust the tension of the top thread by using this little nob here.

Apparently it's extremely naughty to adjust the top tension when the pressure foot is in the upright position. I have no idea why that is.

And I can adjust the tension of the bottom thread by turning this little screw in the hidden shuttle.


It is recommended that once you have the shuttle tension adjusted just so, that you don't touch it again. I think that if you were changing your thread size like from jeans thread to regular sewing thread, maybe you might need to adjust this.


In the end, it wasn't the tension that was the problem. Not really. Well, sort of. The tensions were both set so tightly that the thread couldn't get inside. I backed the tension right off at the top and a bit on the shuttle, rethread the machine, and things magically started working perfectly. I'll be sewing on this in no time.


Antique Treadle Singer Sewing Machine - 127


This is a Singer model 127-3 build in 1918 in St. Jean, Quebec. How do I know this? Most of the old Singers have serial numbers on them which you can look up on their website or you can do what I did which was to ask some fellow enthusiasts at any of the online group of vintage sewing machine collectors.

I downloaded a free manual from the Singer website. There are lots of sewing machine manuals out there on the internet, some free, some not. The one on the Singer site had much clearer pictures than the others. It's still not very easy to make out what the pictures are about, but if you squint hard enough some sort of magic eye effect happens.

So why did I get this sewing machine anyway. The house is lousy with antiques already (in a good way) what do I need this treadled powered monster for?

Although it is very pretty, I didn't get this sewing machine for it's looks. I want to sew on it. I have a perfectly good electric machine that even has a zig zag stitch. The treadle gives a greater feeling of interaction with the sewing machine. It works during power outages (although I jokingly thinking of adding a bicycle headlight to the drive wheel - you know the ones that only work when you are moving). There is a sense of being connected with the past by using such an old machine.

There is also the fact that it is SO old and it still works as well as it did the day it was made. I know it cannot make stitches in the shapes of smiley faces. But can you imagine 93 years later these plastic, electronic, computer driven machines still working?

My vintage Singer was manufactured before planned obsolescence. With the right attention, I suspect that it will keep on working for a hundred or more years to come.

That's why, I hate to say, my special find is not so special. There are literally hundreds for sale locally every year. Some of which are free some are priced at over a thousand dollars. The price is no indication of the condition. Although the free ones usually go before I have a chance to grab them up. If you are in the market for buying an antique or vintage sewing machine. Do you homework, keep an eye on the local Buy and Sell websites, and be patient.


As for the clothes in the photo: That's just me showing off my recent sewing adventures. No, not sewn using treadle power.

I still have to get to know the old gal, so I thought why not make a series of blog posts about getting acquainted with Singer 127.

Saturday, January 29, 2011

2 at once!

I need to learn how to do this!


Friday, January 28, 2011

Wavy Slub yarn


Lovely, soft, and consistently slubby.


I'm really pleased with this yarn and am about to rush out to get more Corriedale from Knotty by Nature so I can spin some more.

I was asked to spin a novelty yarn, plied, that displayed the qualities of this fibre. So I tried a trick out of the Intentional Spinner where I spin one ply slubby and one ply smooth with high twist, then ply them together. The slubs are more or less evenly spaced and more or less evenly sized. I think this would look splendid dyed as the different areas of twist would capture the dye differently.

Thursday, January 27, 2011

weaving fabric, card weaving, and a corset

I've had lots of little projects on the go lately. I've been sewing (more on that another day), taking care of ducks, chickens and alpacas, spinning, and getting ready for weaving


These are the little scraps left over from cutting the pattern out of the fabric. They are too small to do anything with, so I decided to cut them into strips of various sizes and use them for a weaving project.

I figured since I made a skirt and some blouses, why not make a matching vest? The SAORI weaving book has a very simple pattern for one that takes only 1 meter by 0.5m of handwoven fabric. So, if I like how this weaving turns out, I'll transform it into a vest.


I was about to warp the loom the other day, when my friend and mentor arrived with some cards for tablet weaving.


Now I'm totally hooked on this technique. I have all sorts of projects in mind for it! Only problem is that I don't quite have the ergonomics of back strap weaving down yet and am getting quite the back ache.

The back ache could easily be due to the fact that I need more support for my 'endowment'. I'm a rather unusual shape: small ribcage, large endowment. So, a new bra usually sets me back 100$, if I can find one that fits! It's no use getting any old bra as a badly fitting one just makes the back ache worse! Even with all that, it has been years since I've found one with less than 10% synthetic fabric. Anything more than that creates blisters on my skin. (do I hear the world's smallest violin playing?)

Don't worry, I wouldn't be complaining to you about my undergarments unless I had a possible solution in mind.


Aside from being an excellent excuse to use my fountain pen, it's also my first attempt at drafting a corset paten. Instructions for drafting your own Elizabethan Corset available online at the amazing Elizabethan Costuming page.

I'll sew a mock up corset to see if I have the size right - I think that I'll use hemp cord for the bones instead of spending a lot of money on the plastic ones they sell locally. Besides, I'm trying to get away from the whole plastic thing. If it works, then I'll invest in some nice fabric and make another one.

It's nice because this pattern gives an Elizabethan shape to the figure which is a smooth line from the bust to the waist. Most patterns I've come across for corsets are Victorian in style with a clenched waist. Some of them have quite the wasp waist.

There is a kit that I'm very keen on. It is not much more than I would usually pay for a bra, so I think I'll get it, if I have good luck with the Elizabethan pattern. It is Victorian, but the shape is very moderate and well within the range I want. But that's for later.


I know that corsets are considered constrictive, but people have been wearing something like them for hundreds of years. I think it's when you go to the extreme and try to condense yourself into a 10 inch waist, that's where things go wrong. I tried one on once, and it was very comfortable. It instantly got rid of that pesky back ache. I think that this project is worth a try at the very least.

Sunday, January 23, 2011

Wonky Spring Chicken


An extremely good friend of mine has recently given birth to a beautiful baby boy. This handsome young fellow is so tiny, but I don't think that's going to last long. Before you know it, he will be as tall as his dad and into all sorts of good-natured-trouble.

I found this rather wonderful tutorial on the Sew Mama Sew! site. It's teaches you how to sew a Spring Chicken. Since I'm in the middle of a sewing bender, I thought why not.


And here you have it: a Spring Chicken.


I haven't decided if I want to put eyes on it yet. I cannot use buttons for an infant, so it would have to be embroidered on, and I don't know where my floss is... so I think maybe the chicken doesn't need eyes. It's all about colour and texture at this age anyway.


At one part of the tutorial, the author suggests that I "Embrace the wonkiness. This gives you
chicken more character."

This is definitely a Wonky chicken.

Monday, January 17, 2011

Saori skirt made by pulling yarns

There is an big old apple tree right next to the hen house. In the yard, Lucky, the big white rooster, stands guard over his hens, protecting them form monsters of every variety.

Be it an eagle or a bunny rabbit, a mink or a raccoon, Lucky is ready to round up his hens and herd them away from any perceived danger. Certain other things fall under the category of monster: Plywood for example, cardboard, and skirts blowing in the breeze. That last 'monster' - a skirt blowing in the wind - makes it much harder to take a photograph of my new Saori Skirt than I had hoped.

The goal was to make a photo with the chickens gather round the dressmaker's dummy, pecking at the ground, looking all pastoral. Instead most of the photos are of the chickens running away from the dressmakers dummy.

Silly Chickens!


The skirt is woven on a Saori Loom. It is constructed by pulling warp yarns, then sewing the bits together. In the Saori book (the one with English) it is called: Skirt Made by Pulling Yarns. I used a linen warp with mostly wool and alpaca handspun for weft.

I like how the weft strips help to give the skirt a very slimming look and the overall shape of the skirt is very classic.


Sunday, January 16, 2011

Time

Here is something I found on the local CraigsList. It made me smile so I thought I would share it with you all.


I have a functioning time machine (i know it sounds unbelievable, but I assure you it works) that I need a 2nd person to operate with me.

I'm looking for someone who is adventurous and reliable. Preferable a male; or a female that can do heavy lifting.

I am leaving on Jan 30th, 2011, in the morning and plan to return October 2nd, 2010. I am going to June 1983 to handle some business.

If you are serious about time travel and are reliable, then please contact me. You do not have to pay anything, but you would have to provide someone to watch my cat for the time we are gone. The only qualifications needed are that you are reliable and that the circumferance of your head is no more than 64cm.
...


Thursday, January 13, 2011

Three homespun yarns


Yesterday was a very strange day. 10 inches of snow may not seem like much, but it's enough to knock out the power and worse, even when the electricity comes back on, the cable, phone and internet remain offline most of the day. Yesterday I was snowed in with almost no contact with the outside world. It is a weird feeling.

But, not all was lost. I got to shovel the driveway, see to the animals here on the farm, and play with yarn.

I've been spinning yarn to sell at Knotty by Nature. It is very nice of them to sell my yarn. I cannot make huge amounts like a commercial mill, but I do think I make quality. I aim to make something that a large company could not make, and maybe that's why it takes so much more time to create that special yarn.

I've been playing with different ways of pricing the handspun yarn. I think I've found a way of pricing that I'm happy with. It's determined per yard and per times it goes through the wheel. So a plied yarn will be more than a single, and the like. It's works out to be less expensive than people sell on Etsy.com, but more than commercial yarn. Still, I'm only getting about $2 per hour of work I put into the yarn, but when I priced it so that I get around $5 per hour, it didn't sell.

Even still, I hear complaints that it's too expensive, it's not the exact colour they want, I'm not fast enough at spinning, stuff like that. (so far no complaints about quality which makes me happy - mostly just complaints about there not being enough which I suppose should make me happy)

I am not a huge spinning mill. I can only make it the colour of the fibre I have available to me- I use dyes very seldom and when I do, it basically doubles the price because of the kinds of dyestuff I use and my lack of facilities. Quality handmade goods, yarn included, take time and skill. Because of that handspun yarn comes in smaller batches and cannot always be made to order and ready the next day.

But, no matter... I complain too much.


There is compensation for my rantings. Yarn photos:


These two photos taken prior to blocking

So pretty! I love how this Single Boucle turned out. I feel that I am really getting the hang of this technique. This last batch turned out much better and stronger than the yarn I spun before Christmas. This is spun from English Leicester. I buy the locks already dyed, and thus the yarn has a random colour sequence and effect.

There is more of this Singles Boucle at the shop already, I just forgot to take photos of it before I sent it off.


Someone had recently given my some samples of Alpaca. So I hand carded them into little rolags and spun a random colour sequence of natural colours.


Aren't alpacas amazing to have such a variety of colour? I love it!

My aim with this yarn was to give it a homespun effect. I left in small slubs and encouraged slight variation of texture throughout the yarn. The different lengths of the fibre that I was given helped to achieve this effect. It also fluffed up quite nicely when it washed, so I imagine it will provide a nice halo to the finished fabric.

Each colour lasts for about 2-4 yards and the total length of this yarn is over 300 yards. As I spun it I imagined it being knit into a lace scarf, but it would look good as anything.

This is not a yarn I can produce any more of as I only had a handful of fibre. It's limited edition. However, my new alpacas are very similar colours, so if someone likes this yarn, I should be able to make something like it when they are shorn in late spring.


And then there is the grey Romney.

I had intended to spin this with a lovely homespun texture like the alpaca, but I stopped paying attention early and it ended up as a rather constant yarn.

There are over 400 yards of this heathered yarn. It has a wonderful hand. It would be lovely as lace, mitts (maybe with some brightly coloured yarn?), or maybe someone could dye it for that lovely depth of colour that grey fibre adds to any dyeing.

To be honest, I'm not altogether certain I want to sell this yarn. It would be strong enough for warp or weft and given the amount of weaving I've been doing lately, I could see using it for my own project.


I'm actually rather attached to all three of these yarns. But, I could do with the money. I hear a rumour that there might be a half day Saori workshop twice a month. Now, it's just a rumour, but it sure would be nice to have some money just in case it turns out to be true.