Monday, December 30, 2013

Ashford Alpaca Marino fibre

I was blessed with the chance to play with Ashford's new fibre that is coming out soon.  It's a blend of 30% alpaca and 70% marino, and it's fantastic.

It is so soft that the first thing that came to mind is that this must be what baby angels use to knit their wing cozies.  What?!?  Didn't you know it gets cold in the clouds and that baby angels need something to keep their wings warm when they venture out from heaven?  


I was curious to see how it would draft.  Quite often when two different fibres are blended together, the different fibre lengths make things more challenging, but not here.  Both the alpaca and the wool have very similar staple lengths and diameters, which make it a dream to spin. 

This fibre makes a very eaven yarn, and I'm sorry, my photos aren't doing the colours justice.  I would suggest this fibre for anyone from "I've played with a spindle once or twice" beginner level, to "I was born spinning" expert.  The alpaca makes the fibre extra insulating, so expect it to be much warmer than Ashford's regular marino or their merino silk.  I'm thinking it would make great winter socks.


My favourite colours are the grey, the light blue, and the red.  But it's really difficult to choose.  This is going to be a big hit when it gets to the stores.  But shhh, don't tell anyone I mentioned it.

Friday, December 27, 2013

For the 12 days of Christmas, I made a challenge for myself.  Take two fleeces (one icelandic and one alpaca), card them together, then spin them...in 12 days or less.

To do that much, in that short a time, is pushing it even for me.  On top of that, this is another one of those fleeces that doesn't like the drum carder, so a good excuse to practice my hand carding.


At least that was the plan.

The thing is, I've caught a rather nasty version of the flu, so I've spent most of the hours since Christmas asleep, or trying to sleep.  The house is pretty much under quarantine at the moment, so if you do need to stop by, don't get closer to me than 6 feet.

Even still, I've managed to get some carding in.  Today's the first day the fever has gone from moderate to mild, so I'm sitting on the sofa watching TV movies and carding wool.  There are worse ways to spend Christmas Holiday.  

Maybe I can finish this project before Distaff Day.  

Thursday, December 26, 2013

Hay snatching


The llamas have run of the farm after dark.  Besides keeping the grass trimmed, they are great guard animals against raccoons and other intruders.


The two dark coloured ones are llamas.  Left is Max and to the right is Tommy.  Beau is hidden.

This isn't their hay, it is suppose to go to the sheep, but these cheeky fellows couldn't wait for their own breakfast.

Tuesday, December 24, 2013

Happy Holidays 2013

Dinner is in the oven, decorations are up, all there is left now is to sit back, knit, and wait for everyone to arrive.


Happy Holidays everyone.

Cloud and Christmas

I recently finished spinning yarn from Cloud's fleece.  She's a beautiful Icelandic sheep and so loving.  Though, not very photogenic, as she's always too busy asking to be pet to stand still.


Icelandic wool has two dual coated, meaning that they have two distinct kinds of wool mixed together.  The longer wool is called guard hair and the shorter is also softer, and is the undercoat.  There are lots of other names people have for these two coats, but most of them depend on what type of sheep or animal it is.  These ones are just about universal.

You can separate out the two coats and make two different yarns, the undercoat makes a great, lofty woolen yarn, whereas the guard hairs make a strong smooth yarn.

The guard hairs in Cloud's fleece were very soft, so I blended the two coats together with handcarders to make a handspun textured yarn.


Today is Christmas Eve, the day our family has the big dinner.  We have a collection of friends who come from other places, and don't have any family in town to share Christmas with.  So we gather them together at our place for a big Pot Luck dinner tonight.  Busy day cleaning house, but first I'll sit back and enjoy my coffee before everything becomes hectic.

This is also the beginning of the traditional Spinners Vacation.  Though traditions vary from place to place, in the past, a person would spin every day of the year, except for the 12 days of Christmas, starting again on Distaff Day.  Because I'm on such a roll with my spinning right now, and don't want to loose momentum, I'm taking the Yuletide holiday and spinning only yarn for myself.  A few treats that I've been wanting to spin, but couldn't justify taking the time off from other projects.

Saturday, December 21, 2013

How to create handspun texture in yarn

I didn't believe this when I was a new spinner, but nowadays I know how wise my mentors were.  They told me that when you spin long enough, it's almost impossible to make a yarn with a handspun texture.  By handspun, I mean that texture that you tried so hard to get rid of when you were just learning - not-perfect yarn texture.  Lumpy bumpy.

And it's true, to ask my hands to spin a lumpy bumpy yarn again, is really hard.  They have a memory of how to spin a consistent yarn, and that's what they like.  But to a certain extent we can retrain them.

There are some really great techniques for creating a lumpy texture for novelty yarn.  The book The Intentional Spinner is a great source for learning these.  However, they are regular lumps, all a similar size, appearing at regular intervals.  Not that handspun rustic charm that you achieved quite by accident at the beginning.

But don't fret.  There is a way to get random lumpy bumpy yarn again, but this time with a constant twist and integrity to the yarn that makes it easy to work with.  It's called fibre prep.


The key is to blend fibres of different lengths and thicknesses together then spin it.

Here's an example:

Icelandic fleece has both a soft undercoat and a coarser guard hair.


Hopefully this picture shows that the fibres are different lengths and diameters when separated out.


I blended them with alpaca which was even softer than the undercoat but much longer than the guard hairs.

Drafting the blended fibre is a bit frustrating because sometimes things draw out thin and other times you get lumps...oh wait, that's exactly what we want!  This forces you to draft inconsistently, just like a new spinner does.

The key to keep treadling at the same speed.  So if you spin at one treadle per inch of yarn you feed into the wheel, then keep this ratio.  Adjust as needed to keep the ratio of one treadle per inch (or whatever you like - just keep the same ratio).  So if you slow down your drafting because you had to sort out a lump that was a little too big, slow down your treadling to match... draft faster, speed up treadling.  easy...ish.

This way you have a consistent twist throughout the entire skein, even if it gathers in the thin bits, when it comes to the average twist per inch, it's consistent.


I really like this kind of yarn when plied.

This yarn is about 60% icelandic and 40% alpaca by weight, spun and plied on a spindle, and worn around my neck for several days to see how it is going to bloom and wear.  I like it.

I think a cardigan would be really nice from this, with a basic stst and gtst edging, something that shows off the texture of the yarn.

How I used the diz to make roving from my drumcarder

One of my favourite things to do at the end of the year is to tidy up.  Not a full deep clean of the house, that's too daunting, but rather a good old tidy.  I sort through projects half finished, odds left over from previous adventures, and the general detritus that I collect around me.

While tidying up, I kept coming across odd batts and handfuls of fibre.  So I collected them up and blended them roughly on the drumcarder.  It seemed like a good excuse to try a technique I've been wondering about for some time now: Diz off the drumcarder.


A diz is a tool with little holes of varying size.  We choose one of the holes and pull the prepared fibre through the diz.  This is often used for combed fibre, but I was pleased with how well it worked for this project.  By pulling the fibre through the diz, we get a consistent roving (long snake) of fibre that we can spin from.  This is fantastic when you want to avoid making any unnecessary lumps in your yarn, but it is a lot of work, so it has its time and its place.


This is mostly wool, with a pinch of alpaca and llama,  most from my farm, or within a few miles of here.  Very local, very cool.  The colours are natural, as they came off the animal.

Because I didn't blend the colours very much, I have a fun striped roving to work with.  I spun it up in my standard sock yarn style, thin over twisty singles then chain plied for a round yarn.


It came to roughly 120 grams, and almost 300 yards.  I'm going to keep this yarn for myself, as I need some new socks.

Friday, December 20, 2013

Fruiting Lichen

I found some really fun lichen in the forest.  


The little red knobs at the end of the lichen are something called fruiting bodies.  Something to do with how they reproduce...which sort of means I took a photo of lichen in an act of intimacy.  hmmm....lichen porn?  Well, birds do it, bees do it, and it's only natural that lichen does it.

Anyway, this is on an old Douglas Fir stump, the bark takes ages to rot, but lichen loves it.

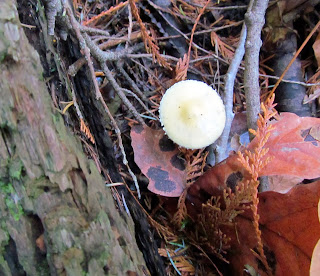
Also tiny cute mushrooms


And this weird thing which I think is lichen.  Most of it of it was growing in the detritus beneath the Western Red Alders, and this one was growing on a stump that was cut down only about 3 years ago.  


Then again, on closer look, it reminds me of a mushroom.  It grew up in about a week and if this was the fruiting body of a lichen, wouldn't it have some sort of year round substance to it?  I'll see if it survives the snow and take more photos of it next time I go for a walk.

I'm not gathering any of these for dye... though their is lots of them.  Right now, I'm only gathering things that aren't attached to anything.  I'm certain even the lichen that blows down from the trees has some roll to play in the forest, so I'm limiting my collection to less than 25% of the blow downs.

Wednesday, December 18, 2013

A mushroom walk

After having such good luck with my recent mushroom adventure, I've started noticing more members of the fungal world... that can't be the right name for it... anyway, went for a lichen gathering trip to the woods today with my camera in tow.  Took lots of photos of mushrooms.  Since I don't eat mushrooms, I don't have to worry about which ones are edible or not.  Besides, I only know of one variety that is for sure, well probably for sure, well, mostly for sure, not poison...or at least, not going to send you to hospital then the morgue.  But I'm told it doesn't taste very good, so I'm not going to bother trying it.

Starting off, a patch of what I'm calling oyster mushrooms.  I'm guessing that's what they might be because our neighbour use to have one of the largest oyster mushroom farms around, and I'm sure some of the mushrooms may have escaped into the wild.


These 'oyster' mushrooms are really soft to the touch, almost frictionless.  Mushrooms are weird but increasingly pretty.

Speaking of pretty, I spotted something nice.


Fairly certain it's the same kind as I found on the ground earlier.  The stump is an old Douglas Fir (for you city folk don't cry about the tree.  It's a woodlot, people cut down trees, that's where the stumps come from.  It's proper management of the forest which is key, and includes removing some trees each year.  Without removing some trees and leaving detritus like stumps and branches in the forest to rot, we wouldn't have nice things like this for the mushrooms to grow on.).

My lay person name for this mushroom is going to be Brown Douglass Bracket Fungus.  Not the correct name, but it's a starting place and allows me to tell it apart from the brown and white fungus of a similar shape that grows on the Big Leaf Maples.  I have a real slow brain for learning latin names, so when I start learning about fungus, I'll make a little picture dictionary for myself with proper botanical names, common names, and my creative names.

um, well, anyway... it's large.  Hand is here so you can get an idea of how big it is.


Now I know this makes colour, and a nice colour at that, the next thing to learn is how to harvest it without doing harm.  It's a really small ecosystem, only about 5 acres, and most of my neighbour's forests are stripped of native species, so I don't want to do any unnecessary harm.  Worse comes to worse, I will stick to salvage botany (picking up plants and stuff that fell down on their own) and leave the mushroom alone to do whatever it is that mushrooms do best.

More random mushrooms that were photogenic.


And another patch of these oyster mushrooms (which are probably not oyster mushrooms at all, but they are nifty to look at).


Random mushroom on a stump


And an even larger Brown Douglass Bracket Fungus.

It looks lighter than the other, at least in the photo, but they were the same colour.  It just shows differently in different lights.  Though I was a bit surprised to find this one on the south side of the stump in direct sunlight. The other ones like the East or North side best. This is growing on a Douglas Fir stump as well, hand in picture to help you get an idea of size.


And here we have Witches Butter.  The only wild mushroom I know for certain.  Doesn't look like much of a mushroom to me, but I'm a fan of the bright colour.


Apparently we can eat Witches Butter, at least I think we can.  But check with an expert source that is relevant to your location before popping wild mushrooms in your mouth.

And yes, another mushroom.


In the fall we get a lot of fluorescent coloured mushrooms, and yellow frilly ones which may be chanterelles.  But this time of year, we get mostly subdued colours.  There should be more in the forest by now, but we haven't had any rain for a while.

Animal photos once again: more geese

I don't think I've shown you these ones yet.


The geese are lovely, but they don't know their own strength.

They are also very protective of us, so if you see them in the yard, don't enter without us.


Tuesday, December 17, 2013

Bracket fungus dyed yarn

I used that bracket fungus I found on the ground earlier to dye some yarn.


The materials:


roughly 80 grams of found fungus
5 grams of unmordanted wool yarn
5 grams of alum mordanted (20% WOF) wool yarn
5 grams of Sauerkraut mordanted yarn (yes, you read that right)

The method


  • Hacked up the fungus in to as small a chunks as I could.  It was quite woody so some of the chunks were much larger than others.  Soaked in water 24 hours.
  • Brought to a simmer for 1 hour, then added the unmordanted yarn.  Turned off heat, got distracted and left the vat with the yarn in it, for about 24 more hours.
  • Brought dye vat to simmer for 1 hour.  Added mordanted yarns (alum and Sauerkraut) and simmered another hour.  The colour from the dye water was almost clear by this stage, so I felt that the vat was exhausted.  
  • Removed and washed yarn.  Dried yarn.  Took photo of yarn.
  • I should mention, I never bothered to take the mushroom bits out of the dye vat at any time, I figured they were big enough not to bother the yarn too much.

from left to right:
no mordant, alum mordant, and sauerkraut mordant


Observations:


  • Unmordanted yarn was the darkest colour.  This makes sense seeing as it was in the dye bath the longest.  It's quite a pleasant, earthy orange-brown.  
  • The Alum yarn was the lightest colour, almost yellow.  It also has a harsh texture, indicating that 20% WOF is way too much for alum.  I'm going to try 10% next time.
  • The Sauerkraut yarn is my favourite for texture and colour.  It is much softer than any of the others including the undyed yarn.  It also has a pleasant sheen to it.  This is something I want to experiment more with in future, for light fastness and washing ability.  It might just be a fluke it worked as a mordant, but I wonder if the live enzymes and the acid worked together somehow.  


No mordant, alum mordant and sauerkraut mordant
with original yarn sample on top


How I mordanted the Sauerkraut yarn - had a very old vat of sauerkraut (live culture, not canned) that was heading to the compost, so I stuck the yarn in the juice for about two hours, then heated the entire thing, cabbage and all, to the boiling point.  I didn't even bother rinsing it before plunking it in the dye vat.